Requirements
- Blender properly installed in the system.
- Place the .blend files inside the Unity project’s Assets folder (or a subfolder inside Assets).
You can open them for editing by double-clicking the file in Unity. After saving the file in Blender it will be automatically reimported when switching back to Unity. - Place all the texture files in a subfolder named Textures in the same folder as the .blend file. A subfolder named Materials will be automatically created by Unity.
When assigning textures in Blender ensure to select the files located in the Textures folder. Unity 3D will automatically assign them to the materials in the imported object.
Assign textures to objects
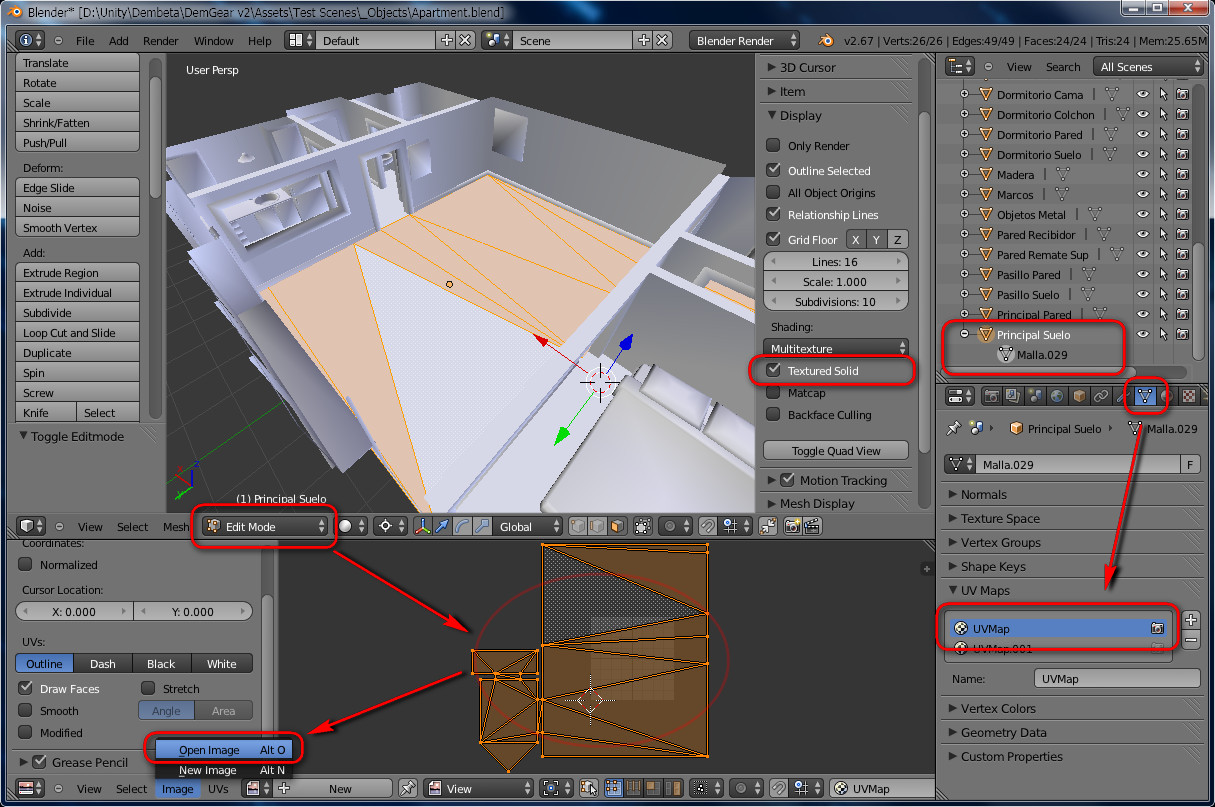
- Choose the object and switch to Edit Mode (TAB).
- Mesh tab: Select the UV Map to asign the texture to. In Unity 3D the first UV Map is used for the texture and the second UV Map is used for lightmap.
- Select all faces in the UV Map (locate the cursor over the UV editor, then press A).
- Image > Open Image (Alt O), then choose the image file.
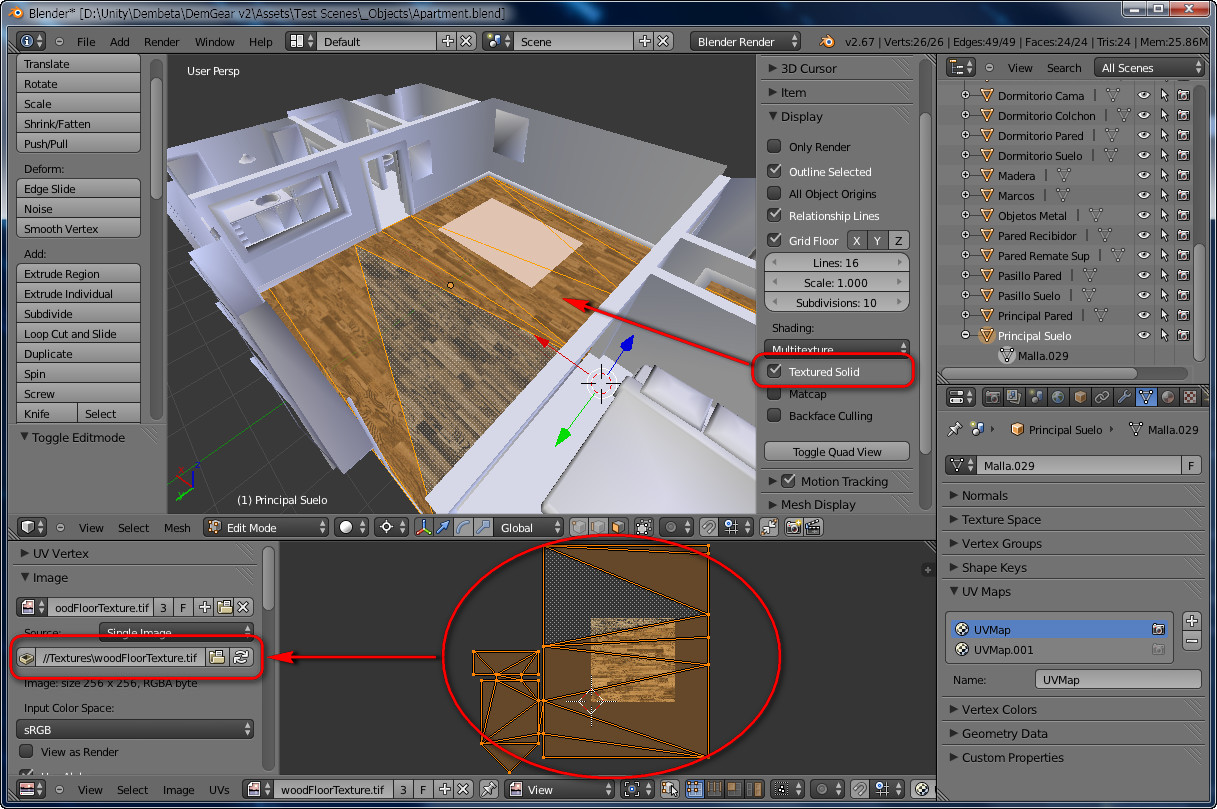
- The texture is assigned to the selected faces.
- The Textured Solid setting displays the texture in the 3D View.
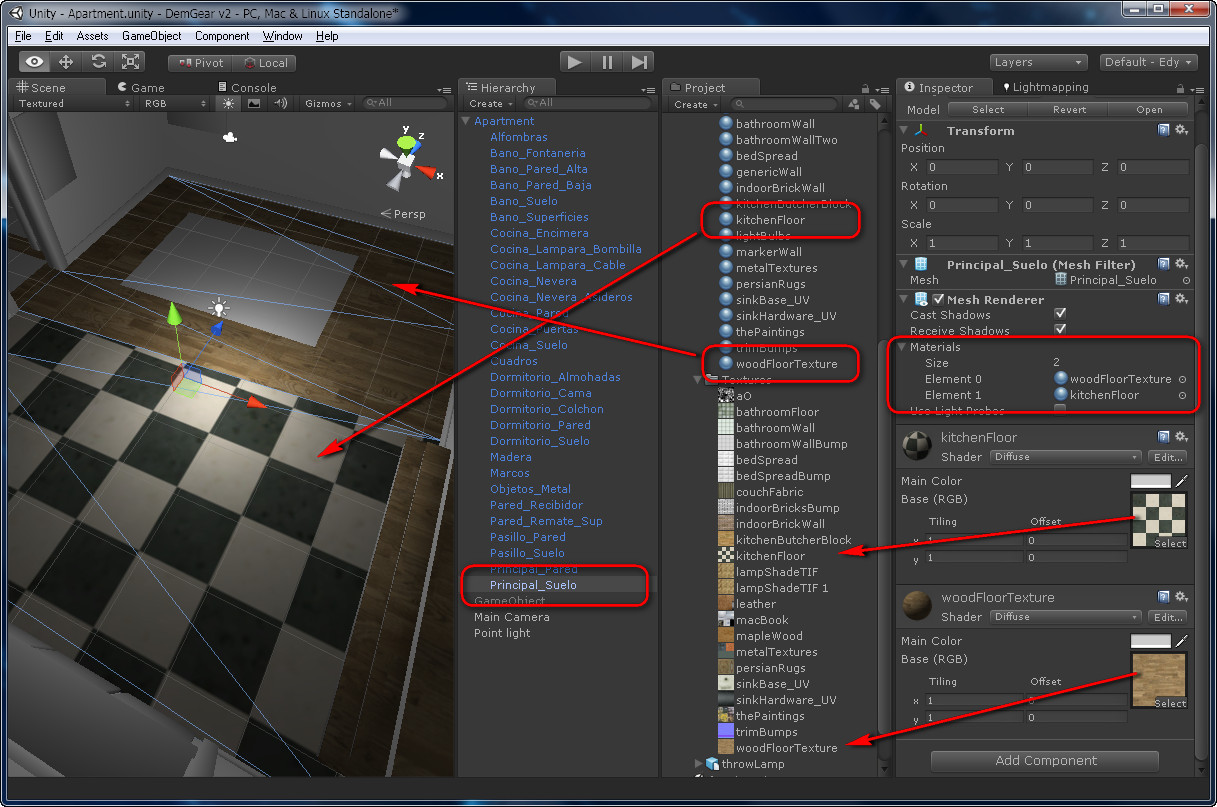
- Unity 3D will take the name for the material from the Source field (when By Base Texture Name is selected as Material Naming in Unity 3D).
- The object’s Material name is ignored in Unity 3D (when By Base Texture Name is selected as Material Naming in Unity 3D).
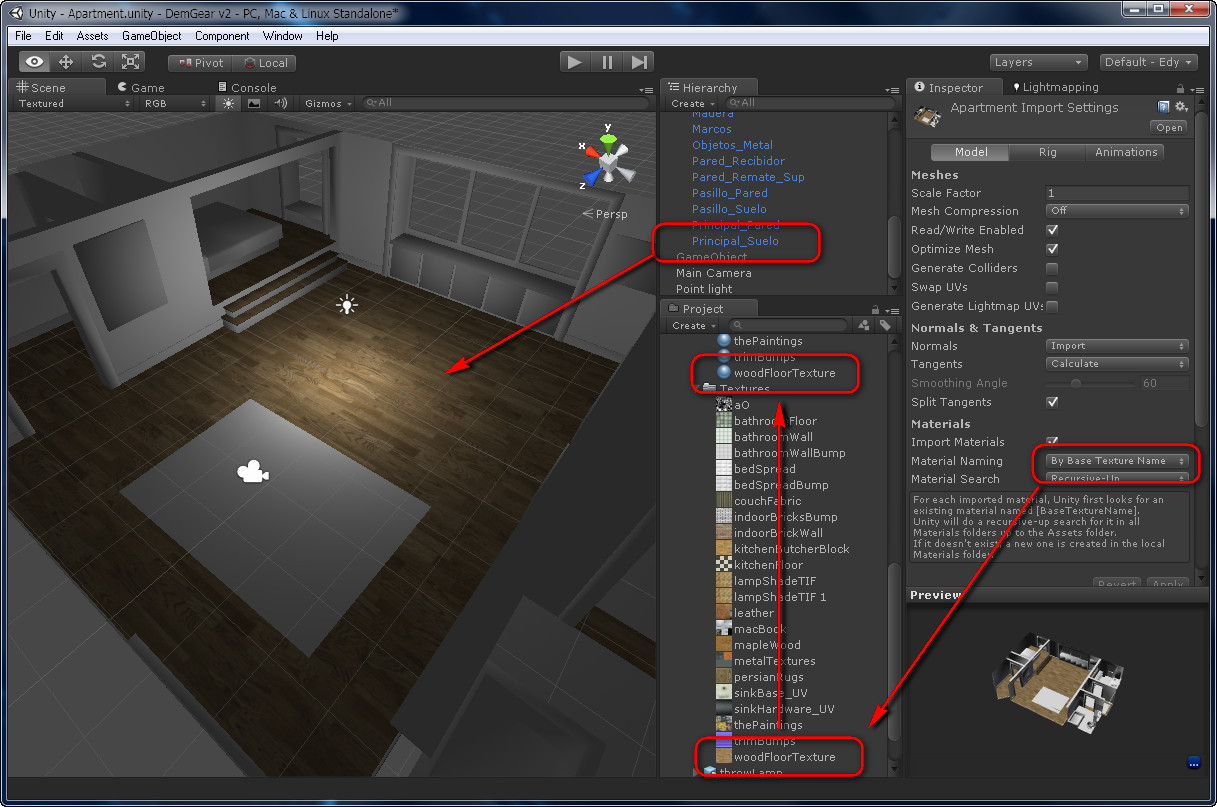
- The name of the object will be the same in Unity 3D.
- The name of the mesh in Blender is ignored in Unity 3D.
- A material with the name of the texture is created and the texture is assigned to it.
- Note: If the material in Unity 3D doesn’t receive a texture, then ensure there isn’t a Material in the Blender scene with the same name.
Multiple textures in the same object
- Choose the object and switch to Edit Mode (TAB).
- Mesh tab: Select the UV Map to asign the texture to. In Unity 3D the first UV Map is used for the texture and the second UV Map is used for lightmap.
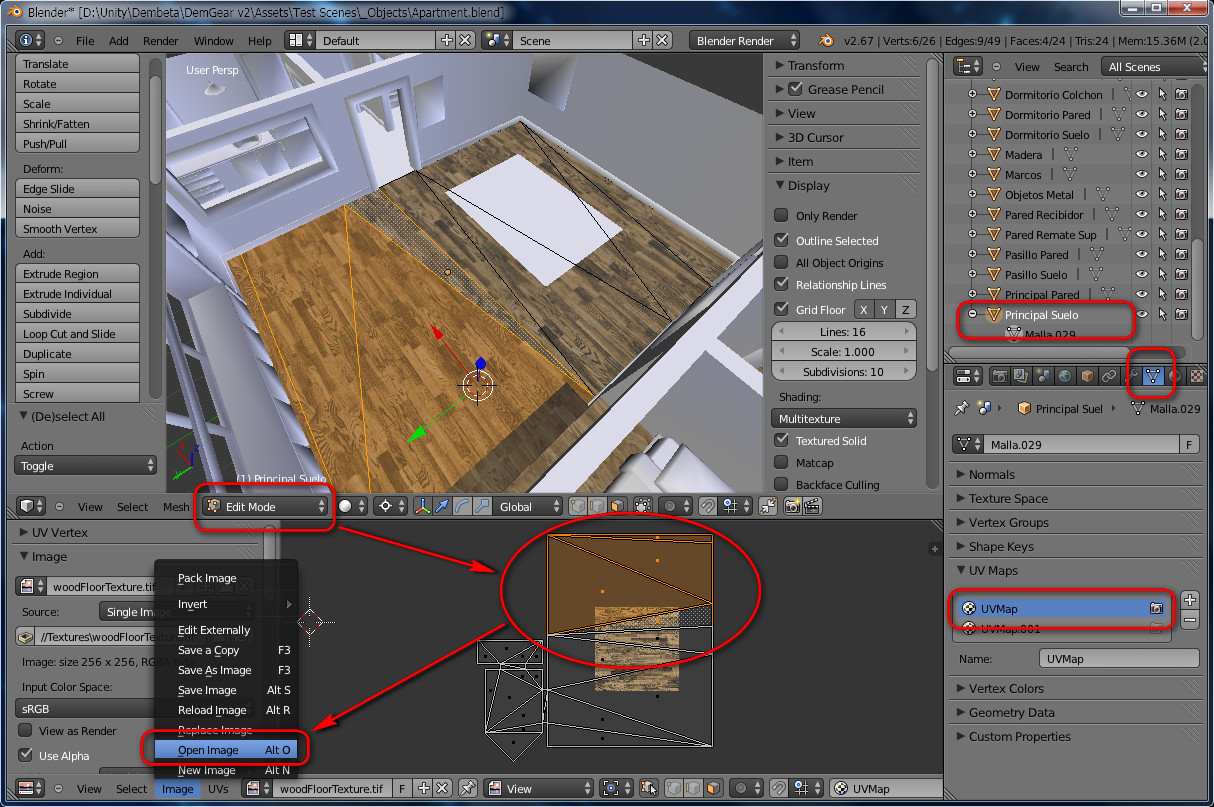
- Select the face or faces you want to assign the texture to.
- Image > Open Image (Alt O), then choose the image file.
- Repeat from 3. for each face or group of faces.

- Only the faces selected in the UV Editor receive the texture.
- The Textured Solid setting displays the texture in the 3D View.
- The UV Editor shows the texture assigned to the focused face. The focused face is displayed with a different shading.
- In Unity 3D a material is created for each texture that is assigned to the material. Each material takes the name of its texture.
- The faces without a texture assigned will receive an unnamed default material.
Texture management
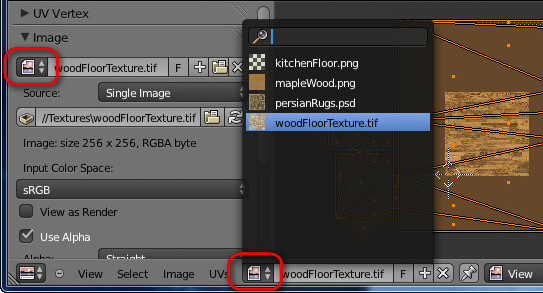
- When a texture is loaded an Image data object is created for it. The available images are listed when clicking the Image icon.
- The Source field points to the image file assigned to the selected Image object.
- The textures can be quickly assigned to the selected faces by using the Image list.
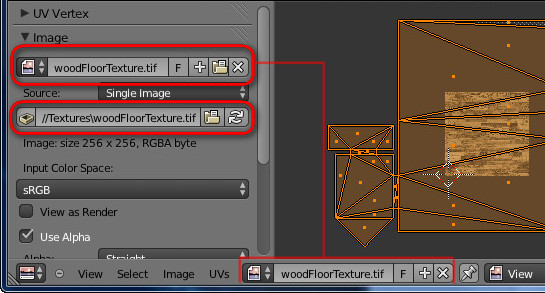
- The texture can be unassigned from the selected faces by clicking the X at the Image selector. The faces without a texture assigned receive an unnamed default material in Unity 3D.
- The file the Image reads can be changed by editing the Source field, either directly or by selecting another file with the Open File icon.
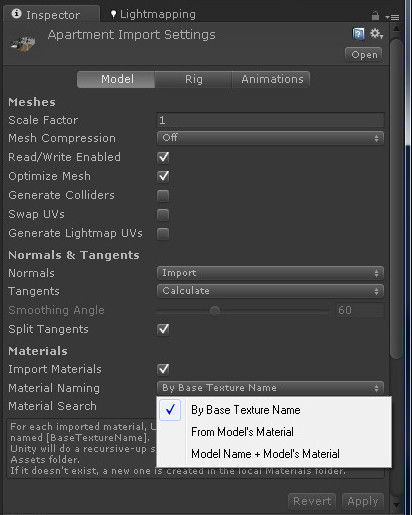
When By Base Texture Name is selected as Material Naming in Unity 3D:
- Unity 3D uses the Source field as name for creating the materials.
- The name of the Image object is not relevant to Unity 3D. It can be freely renamed in Blender.
Materials
In all cases Materials in Blender only export their diffuse color to the material in Unity 3D (gray 0.8 / 204 by default). Note: for the material color to be displayed in Blender’s 3D View the Textured Solid option must be disabled.
When a Material Name is required below and the object has no materials assigned then a default material is created in Unity 3D: unnamed
When By Base Texture Name is selected as Material Naming in Unity 3D:
- Unity 3D uses the Source field (the name of the image file) as name for creating the materials: File_Name (without extension)
- The name of the Image data object is ignored in Unity 3D. It can be freely renamed in Blender.
- If the object doesn’t have textures assigned or there are faces without texture then Unity 3D uses the name of the Material as name for creating the materials: Material_Name
When Model’s Material is used in Material Naming in Unity 3D:
If the object has textures assigned:
- Unity 3D uses the name of the Material and the name of the Image data object as name for creating the materials: Material_Name__Image_Name
- Note that the name of the Image data object is used, NOT the Source field (image file name) as previously.
- If the object has texture but no material assigned then None is used as material name.
If the object does not have textures assigned:
- Unity 3D uses the name of the Material as name for creating the materials: Material_Name
no hay manera de que Unity me aplique la textura, ni con un simple plano, ¿podrías concretar cómo importas el objeto? ¿utilizas el archivo .blend directamente o lo exportas a fbx? Si lo exportas, ¿con quñé parámetros? Algo me estoy dejando y ya no sé qué puede ser…
Added a new section “Requirements” at the top of the document.
ok I will follow this tips, thanks
Really useful article, thanks so much.
I’d been assigning textures to materials in Blender and wondering why I was getting confusing materials names with some missing textures in Unity. Now I know why.
I guess this means I have to assign all my normal maps within Unity then.
very good
can we import materials in cycles to unity
Hm. Tried this with Blender 2.76 and Unity 5.01. Doesn’t work. No textures imported, nothing assigned to the texture slots in Unity. Could you please post a .blend which works?
Hi there
I just checked out your website edy.es and wanted to find out if you need help for SEO Link Building ?
If you aren’t using SEO Software then you will know the amount of work load involved in creating accounts, confirming emails and submitting your contents to thousands of websites.
With THIS SOFTWARE the link submission process will be the easiest task and completely automated, you will be able to build unlimited number of links and increase traffic to your websites which will lead to a higher number of customers and much more sales for you.
IF YOU ARE INTERESTED, We offer you 7 days free trial
CONTACT US HERE ==> dindinaa421@gmail.com
Regards,
Best Seo Software